Try Building for the Web with Unity
Testing builds for the web with Unity.
I believe the default is WebGL, but later, I would like to try WebGPU as well.
Testing builds for the web with Unity.
I believe the default is WebGL, but later, I would like to try WebGPU as well.
Following on from the previous Unity article, this time we want to review the UE5 shader code. UE5 allows you to read the entire source code, so first we will get the source code from github.
The procedure is as follows.
The build will take quite a while.
First, the latest version of Unity at this time is 6000.0.40f1, so we will use this version to examine the shader code.
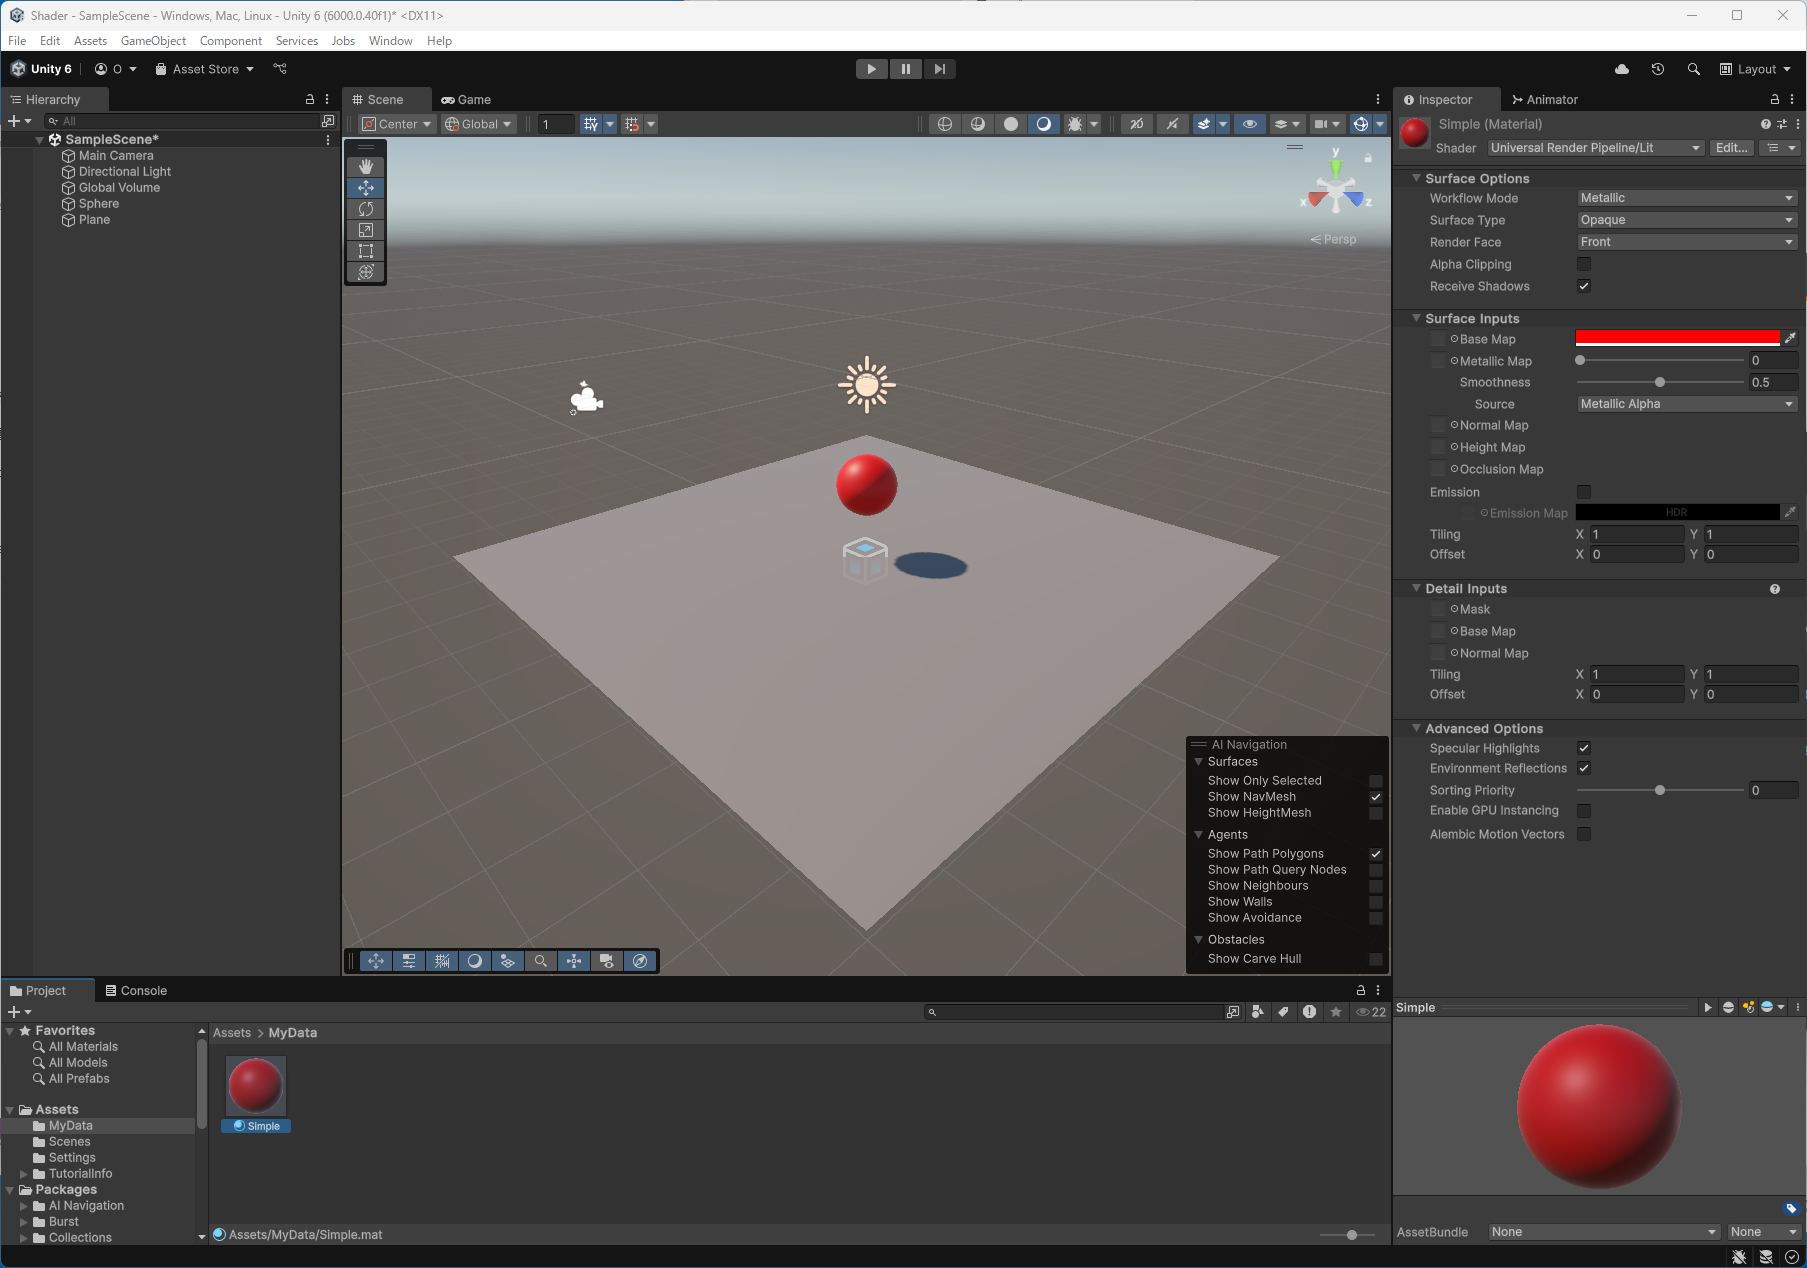
Unity has three types of drawing pipelines: Build-in , URP, and HDRP. I believe that URP is currently the most commonly used, so I will create a project using URP. First, place a Plane as the floor surface of the scene, and place a Sphere on it. Then, create a new Material, set the BaseMap color to red, and apply it to the Sphere to get this screen.
It has been a while since I have blogged, but today I would like to summarize my research on PBR while reading the following book.
This book discusses the well-known 3DCG texture function,Bidirectional Scattering Distribution Function(BSDF), and how to implement it in ray tracing. The book covers “Lambert BRDF,” “Phong,“Blinn-Phong, “Perfect Specular, Perfect Refractive,“Torrance-Sparrow,Cook-Torrance, “GGX,” and “Disney BRDF.”
First of all, I bought this book about 2 years ago, although the title sounds difficult.
I bought the book plus the electronic version, although only the electronic version is available now. I had the book on my stack for a long time and suddenly I wanted to sort out the terminology and history of PBR.
Whenever I write a program in Direct3D, I am always concerned about the fact that it is a left-handed system. I was used to right-handed systems because my first 3DCG learning experience was with OpenGL, and the mathematics I learned as a student must have been right-handed as well. I also think that many of the GL-like APIs for game consoles were also right-handed. And yet, I think that Direct3D’s adoption of the left-hand system has made complex 3DCG even more complex.
Many people think that the right-hand system and the left-hand system are just different in matrix calculation, but the biggest difference is that the definition of the Z buffer changes. Whereas the right-hand system is in the range-1~ 1, the left-hand system is in the range 0 ~ 1. The projective transformation matrix changes accordingly, clipping range changes, the orientation of the vectors in the outer product calculation changes, and the orientation of the polygon faces changes. Frankly, just reading the program, I am not quite sure what the correct code is.
Debugging even simple shaders to see if they are working correctly is difficult. At first I tried to debug using PIX, but although I could see the contents of the constant buffer, I could not see the VertexShader vertex data, I wondered if my settings were bad, but when I asked Dr. ChatGPT, his answer was to use RenderDoc when in trouble, so I decided to use RenderDoc with half a doubt.
RenderDoc worked easily. I could see the vertex data of VertexShader without any particular settings, and the step execution of shaders worked without any problem.
The debugging method for VertexShader is as follows.
I decided to try drawing an arbitrary mesh in Direct3D12, so I first created the mesh data.
I use Maya in my work, but this time, I will create the data in Blender. Since this is my first time, I created the rocket mesh while reading this book on Kindle Unlimited.
I think this book is simple and easy to understand.
Next, I figured out how to bring the Blender data toC++. This time, the two types of data needed will be vertex data and index data. (Materials will come later.)
If we were to export the Blender data, we could use fbx, usd, and glTF formats. Each also provides a python API so you can get the data you need. However, each was more tedious than I expected when I tried to dump the vertex data in python. Is there a more user-friendly format?
Last time, try to render the R10G10B10A2 format on an HDR display, For now, we have confirmed that the display is brighter than R8G8B8A8.
Now we would like to try to see how we can adjust it to bring the SDR and HDR looks closer together.
First, we will simply write PixelShader so that we can set the scaling in linear color.
struct PSInput {
float4 position : SV_POSITION;
float4 color : COLOR;
};
static const float3x3 Rec709ToRec2020Matrix = {
1.2249, -0.0420, -0.0197,
-0.0184, 1.2045, -0.0158,
-0.0051, -0.0249, 1.2796
};
// Conversion from sRGB to linear color
float3 SRGBToLinear(float3 color) {
return (color <= 0.04045) ? (color / 12.92) : pow((color + 0.055) / 1.055, 2.4);
}
// PQ Correction Function (ST 2084, Simplified)
float3 PQCorrect(float3 color) {
// PQ curve constants (Simplified version)
float m1 = 0.1593;
float m2 = 78.8438;
float c1 = 0.8359;
float c2 = 18.8516;
float c3 = 18.6875;
// PQ Curve Encoding Formula
return pow(max((c1 + c2 * pow(color, m1)) / (1.0 + c3 * pow(color, m1)), 0.0), m2);
}
float4 PSMain(PSInput input) : SV_TARGET {
// Scale
float scale = 0.01;
// Converts sRGB to linear
float3 linearColor = SRGBToLinear(input.color.rgb) * scale;
// Convert Linear Color to Rec. 2020
float3 rec2020Color = mul(Rec709ToRec2020Matrix, linearColor);
// PQ Curve Correction (Rec. 2020)
float3 finalColor = PQCorrect(rec2020Color);
return float4(finalColor, input.color.a);
}
Display on HDR600 display with Direct3D12
Continuing from the last issue, this is display-related.
As I mentioned last time, this display I recently bought supports HDR600.
Dell AW2724DM 27-inch Alienware Gaming Monitor
The following article and others are a good explanation of HDR600.
https://chimolog.co/bto-gaming-monitor-vesa-hdr/
The number 600 represents a brightness of 600 nits.(nit=cd/m2)
A conventional SDR display is about 100 nits, which means that it can express a much brighter image.
Let’s check it with Direct3D12.
First, change the frame buffer format to 10-bit RGBA.
//#define FRAME_BUFFER_FORMAT (DXGI_FORMAT_R8G8B8A8_UNORM)
#define FRAME_BUFFER_FORMAT (DXGI_FORMAT_R10G10B10A2_UNORM)
Try G-SYNC Compatible with Direct3D12
Previously, we were able to freely change the refresh rate in full-screen mode,
This time, we would like to check the operation of variable refresh rate.
I have two displays that I use, one of which is this display that I recently bought.
Dell AW2724DM 27-inch Alienware gaming monitor
- NVIDIA G-SYNC Compatible
- AMD FreeSync Premium Pro
- VESA AdaptiveSync
It states that the product is compatible with
The other is a 28" display from iiyama.
This one is older and does not support variable refresh rate.
First of all, what is the refresh rate of a display? If it says 60Hz, it means it displays images 60 times per second.
How the image is displayed is by scanning image data one line at a time, starting from the top left corner, to light up the pixels of the LCD or OLED.
Displaying that one image is repeated at an interval of once every1/60seconds.
1/2
»