Previously, we were able to freely set the refresh rate,
This time, we will be able to freely set the drawing fps.
To do so, we need to change the double buffer to a triple buffer, eliminate the VSync wait, and execute Present.
Roughly speaking, the differences are as follows.
Double buffer
A method of switching between two buffers, a front buffer and a back buffer. VSync wait is required to avoid tearing.
Triple buffer
Triple buffer: Switching between three buffers (front buffer and back buffer x2) without VSync wait to avoid tearing.
In the case of Direct3D12, the internal processing is difficult to understand because it is handled well in the Present, and if you make a mistake in the settings, you may get an exception or tearing.
Tearing is a phenomenon in which different frames are displayed at the top and bottom of the screen, making the image appear to flicker.
Although not limited to Direct3D, PC applications need to control the frame rate.
If the frame rate can be determined according to a fixed refresh rate, as in a game console,
You can control the frame rate by simply waiting for VSync, but PC monitors have a variety of refresh rates, so the app itself will need to control the frame rate.
The easiest way would be to measure the time since the previous frame, and if that time is faster than the specified frame rate, then Sleep.
It looks like this
classFrameController {
public: FrameController() : mFPS(60.0f), mSleepCounter(0) {
QueryPerformanceFrequency(&mFrequency);
QueryPerformanceCounter(&mPrevious);
mStart = mPrevious;
}
virtual~FrameController() {}
doubleGetTimeFromStart() const {
LARGE_INTEGER now;
QueryPerformanceCounter(&now);
double duration_sec =static_cast<double>(now.QuadPart - mStart.QuadPart) / mFrequency.QuadPart;
return duration_sec;
}
floatUpdate(float fps =0.0f)
{
// Change Sleep accuracy
timeBeginPeriod(1);
mSleepCounter =0;
// Measure time from previous frame
LARGE_INTEGER now;
QueryPerformanceCounter(&now);
double duration_sec =static_cast<double>(now.QuadPart - mPrevious.QuadPart) / mFrequency.QuadPart;
if (fps >0.0f)
{
// Sleep to control frame interval
double limit_sec =1.0/ fps;
while (duration_sec < limit_sec)
{
// Sleep until half of the remaining time
constdouble SLEEP_RATIO =0.5;
int sleep_msec =static_cast<int>(1000.0* (limit_sec - duration_sec) * SLEEP_RATIO);
Sleep(sleep_msec);
++mSleepCounter;
// Remeasure time
QueryPerformanceCounter(&now);
duration_sec =static_cast<double>(now.QuadPart - mPrevious.QuadPart) / mFrequency.QuadPart;
}
}
// Return to Sleep Accuracy
timeEndPeriod(1);
// Update frame rate (multiply by WEIGHT since averaging is tedious)
float current_fps =float(1.0/ duration_sec);
float FPS_WEIGHT =0.1f;
mFPS = mFPS * (1.0f- FPS_WEIGHT) + current_fps * FPS_WEIGHT;
// Update the time of the previous frame
mPrevious = now;
return mFPS;
}
// For debugging
intGetSleepCounter() const {
return mSleepCounter;
}
private: LARGE_INTEGER mFrequency;
LARGE_INTEGER mPrevious;
LARGE_INTEGER mStart;
float mFPS;
// For debugging
int mSleepCounter;
};
In windowed mode, the resolution can be set by changing the window size. (Of course, the RTV will have to be rebuilt.)
However, the refresh rate cannot be set on a per-window basis.
To change the refresh rate, you must be running in full screen.
In my previous article, I wrote about how to switch to full screen, so this will be a continuation of that article.
First, I asked Dr. ChatGPT how to change the refresh rate, and he told me about an API called ResizeTarget.
However, this method does not change the actual display settings, but only the display mode of SwapChain.
It does not change the Window settings, etc., so the imgui settings are not reflected, and it did not work.
While listening to Dr. ChatGPT, I implemented switching between full screen mode and windowed mode in Direct3D12.
The idea is to switch between the two by pressing the F11 key.
SampleApp g_app;
extern IMGUI_IMPL_API LRESULT ImGui_ImplWin32_WndProcHandler(HWND hWnd, UINT msg, WPARAM wParam, LPARAM lParam);
LRESULT CALLBACK WndProc(HWND hWnd, UINT message, WPARAM wParam, LPARAM lParam) {
// ImGui Window Processing
if (ImGui_ImplWin32_WndProcHandler(hWnd, message, wParam, lParam)) {
return true;
}
staticbool isFullscreen = false;
staticbool isFullscreenInActive = false;
static WINDOWPLACEMENT windowPlacement = { sizeof(WINDOWPLACEMENT) };// save position and size in window mode
switch (message) {
case WM_DESTROY:
g_app.SetFullscreenState(FALSE);
PostQuitMessage(0);
return0;
case WM_KEYDOWN:
if (wParam == VK_F11) {// Switch with F11 key
if (isFullscreen) {
// Return to window mode
g_app.SetFullscreenState(FALSE);
SetWindowLong(hWnd, GWL_STYLE, WS_OVERLAPPEDWINDOW);
SetWindowPlacement(hWnd, &windowPlacement);// Restore previous window position and size
SetWindowPos(hWnd, nullptr, 0, 0, 0, 0, SWP_NOMOVE | SWP_NOSIZE | SWP_NOZORDER | SWP_FRAMECHANGED);
isFullscreen = false;
}
else {
// Put the window in full screen mode
GetWindowPlacement(hWnd, &windowPlacement);// Save current window position and size
SetWindowLong(hWnd, GWL_STYLE, WS_POPUP | WS_VISIBLE);// Remove window border and title bar
SetWindowPos(hWnd, HWND_TOP, 0, 0, 0, 0, SWP_NOMOVE | SWP_NOSIZE | SWP_FRAMECHANGED);
//SetWindowPos(hWnd, HWND_TOP, 0, 0, GetSystemMetrics(SM_CXSCREEN), GetSystemMetrics(SM_CYSCREEN), SWP_FRAMECHANGED);
g_app.SetFullscreenState(TRUE);
isFullscreen = true;
}
}
return0;
case WM_SIZE:
if (wParam != SIZE_MINIMIZED) {
UINT width = LOWORD(lParam);
UINT height = HIWORD(lParam);
g_app.SetScreenSize(width, height);
}
break;
case WM_ACTIVATE:
if (wParam == WA_INACTIVE) {
// When a window is deactivated
if (isFullscreen) {
// Return to windowed mode from full screen mode
g_app.SetFullscreenState(FALSE);
SetWindowLong(hWnd, GWL_STYLE, WS_OVERLAPPEDWINDOW);
SetWindowPlacement(hWnd, &windowPlacement);// Restore previous position and size
SetWindowPos(hWnd, nullptr, 0, 0, 0, 0, SWP_NOMOVE | SWP_NOSIZE | SWP_NOZORDER | SWP_FRAMECHANGED);
isFullscreenInActive = true;
}
}
elseif (wParam == WA_ACTIVE || wParam == WA_CLICKACTIVE) {
// If the window becomes active again
if (isFullscreenInActive) {
// Return to full screen if necessary
SetWindowLong(hWnd, GWL_STYLE, WS_POPUP | WS_VISIBLE);
SetWindowPos(hWnd, HWND_TOP, 0, 0, 0, 0, SWP_NOMOVE | SWP_NOSIZE | SWP_FRAMECHANGED);
g_app.SetFullscreenState(TRUE);
isFullscreenInActive = false;
}
}
return0;
default:break;
}
return DefWindowProc(hWnd, message, wParam, lParam);
}
Writing a Direct3D application requires debug drawing. Debug drawing is, for example, drawing the frame rate and various settings on the screen.
It is not used in the final product, so we want to make it so that it can be separated and compiled.
I have tried to incorporate this with the help of this website.
Direct3D12 takes the form of buffering drawing commands in a command list and executing them together.
A simple description of the process to be executed every frame is as follows.
{
// Start of command list
commandAllocator->Reset();
commandList->Reset(commandAllocator.Get(), pipelineState.Get());
// Execute various drawing commands to create a command list
...
// Execute buffered command list
commandList->Close();
ID3D12CommandList* commandLists[] = { commandList.Get() };
commandQueue->ExecuteCommandLists(_countof(commandLists), commandLists);
// View swap chain
swapChain->Present(1, 0);
}
First, before explaining the Direct3D12 program, we will write a program to display only a Window.
Basically, all you have to do is create a Window with CreateWindow and process messages in the main loop.
Incidentally, Window applications are message-driven. For example, operations such as moving, resizing, or closing a Window are stored in a queue in the form of messages.
The program processes the messages in the main loop. Therefore, when there are no messages, the program is in the same state as if it were in Sleep.
This is not suitable for programs such as game programs that process animation and other operations in real time, frame by frame.
First, to build a Direct3D12 app, you need to include the Direct3D12 header files and link the library files.
In the past, you could download something called the DirectX SDK and write the include and link settings in VisualStudio,
Now it seems that the DirectX SDK is gone and is included in the Windows SDK.
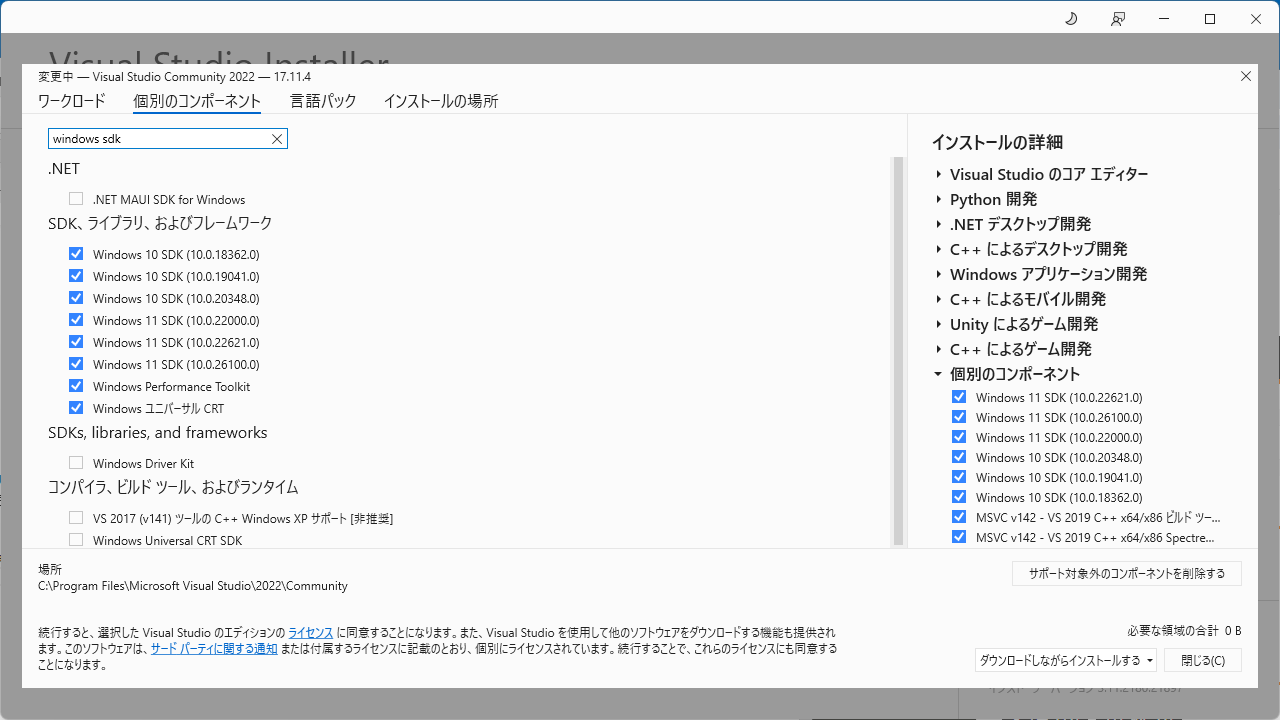
So where is the Windows SDK? You can run an app called Visual Studio Installer, select it from the VisualStudio components, and install it.
There are Windows 10 SDK and Windows 11 SDK, multiple versions, and you may not know which one to choose.
If you are just building your own application, you only need to install the latest version. If you are building someone else’s program, it is safer to include the older version.
First, I would like to summarize how to create this homepage before writing an article related to 3DCG.
This homepage is created using Hugo.
Since I am not familiar with web-based technologies, I thought I would use a CMS such as WordPress or MovableType to create the website. However, when I looked into it, it seemed difficult to have it customized in my own way, so I decided to use Hugo, which creates static pages from what I wrote in markdown. I chose a theme called Mainroad for now.
As this is my first article, I would like to introduce the author.
My name is Orimoto.
For many years I have worked as a 3DCG-related programmer in Tokyo and Osaka. From October 2024, I will be moving to Hiroshima to work full remote in the form of outsourced work, while writing this technical blog.
As for my background in game companies, I have mainly worked on Nintendo systems, including Nintendo64, GameCube, Wii, WiiU, 3DS, and Switch. More low-end than high-end, and I’ve done more work on development environments than on game development itself.